How to Secure Your Supabase Database and Storage
Safeguarding Your Data by Proactive Measures

Unless you’re a Multimillion or a Billion dollar company, you probably don’t have a multimillion-dollar ad budget or professional Spinners. Your product needs to stand out on its own merits like App Quality, Performance, UI design, and User Experience. Most companies don't care about you, your product, and your vision or dreams. They don't give a damn about either their work helped you to get more business, revenue, users, or solving a problem. That's where CANOPAS comes into the picture. Whether you have a GREAT IDEA and you want to turn it into a DIGITAL PRODUCT. OR You need a team that can turn your NIGHTMARES into SWEET DREAMS again by improving your existing product. We help Entrepreneurs, startups, and small companies to bring their IDEA to LIFE by developing digital products for their business. We prefer using Agile and Scrum principles in project management for flexibility and rapid review cycles. We are not bound by technology. We will learn new technology if it significantly improves the performance of your app. We will solve your tech-related problems even though we are not THE EXPERT in it. And we've done it multiple times in the last 7 years. In the last seven years, we helped... A STARTUP to expand its users from 2500 to over 100000 by developing mobile apps for them. An enterprise client to redevelop their app that has 1M+ monthly paid users and 10M+ app downloads. Another enterprise client(5M+ app downloads in each store) to fix bugs and broken parts in the app and as a result, they had over 98% crash-free users. We offer a 100% MONEY BACK GUARANTEE if you don't like our work. No questions asked. Visit : https://canopas.com/blog
Exciting News! Our blog has a new home! 🚀
Introduction
In the era of data breaches and cybersecurity threats, safeguarding sensitive information is paramount for businesses and developers.
With the rise of cloud-based databases and storage solutions, such as Supabase, Firebase, AWS, or Google Cloud Firestore ensuring the security of your data is more critical than ever.
Supabase is an open-source platform that provides developers with a set of tools to build scalable and secure web applications.
Leveraging PostgreSQL as its database engine and integrating with popular authentication providers like Auth0 and Firebase, Supabase offers a comprehensive solution for managing data and user access in modern web applications.
In this blog post, we’ll explore the best practices and strategies for securing your Supabase Database and Storage, helping you mitigate risks, and protecting your valuable data assets.
Database Security
A robust database security strategy is essential for protecting your data from unauthorized access, manipulation, or theft. Here are the step-by-step implementations to consider.
Create a table with the required fields
In Supabase, creating a table is straightforward. we can do this through the SQL editor provided in the Supabase dashboard.
Navigate to the SQL editor and execute a CREATE TABLE statement to define the structure of your "users" table. For example,
create table users (
  id bigint primary key generated always as identity,
  auth_uid text not null, // optional - to store auth user id from supabase.auth
  name text not null,
  email text not null,
  created_at timestamp with time zone default current_timestamp
);
In this definition, auth_uid field is optional. It will required if we want to grant access to all the supabase authenticated users. We’ll see later how it works.
Also, we can create it by using the Supabase table editor like,
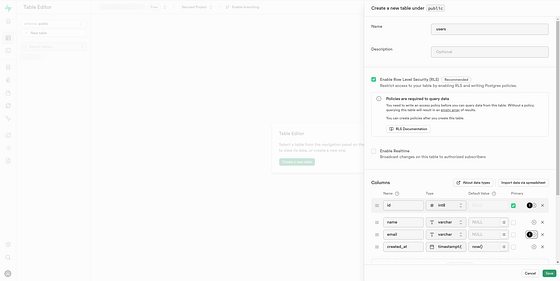
Create a table using the Supabase table editor
Customize the fields based on your application’s requirements. In this example, we have fields for user ID, name, email, and creation timestamp.
Create a user for authentication
The auth methods can be accessed via the supabase.auth namespace.
When we use supabase.auth to handle authentication in your application, it interacts directly with the Supabase authentication system.
This means that when a user signs up using your application's authentication flow (powered by supabase.auth), Supabase automatically creates a corresponding user record in the authentication system.
const { data, error } = await supabase.auth.signUp({
  email: 'example@email.com',
  password: 'example-password',
})
However, there might be scenarios where we need to manually create user records, such as during development or for administrative purposes.
In such cases, we can add users directly from the Supabase dashboard using the following steps:
1. Navigate to the Authentication tab in your Supabase dashboard.
2. Under the Users section, we can manually create a user by clicking the Add user — Create new user button.

Create a user for authentication
3. Fill in the required user details such as email and password to create a new user account.
This step simulates the creation of a user account in your application, allowing us to test authentication and access control policies.
Create policies for the users table
In the Supabase dashboard, navigate to the Policies section from the Authentication tab.
Here, you’ll find a list of tables in your database schema. Locate the “users” table that we created earlier.

Create policies for user's table
To create a policy for records from the “users” table, click on the “Add new policy” button.
This will open a dialogue box where we can specify the details of the new policy.
— Select record policy
In the dialogue box, you’ll see a list of available policy templates.
Click on the first template labeled “Select” to create a select record policy.
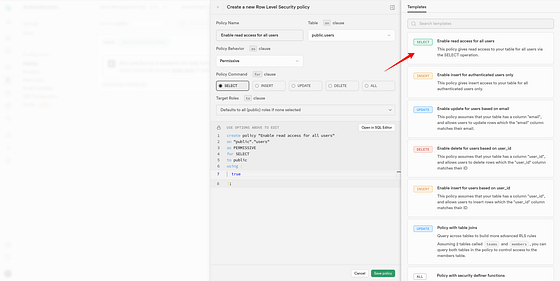
Add select record policy for the user's table
The policy name and required settings will be automatically populated based on the selected template. Review the settings to ensure they align with your requirements. We can customize the policy further if needed.
After configuring the policy settings, click on the “Save policy” button to save your changes.
— Insert record policy
Now, let’s walk through the process of setting up an insert record policy for the “users” table.
In the dialogue box, click on the template labeled “Insert” to create an insert record policy.
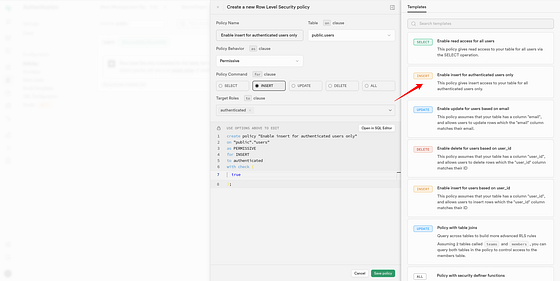
Add insert record policy for user's table
The policy name and required settings will be automatically populated based on the selected template. Review the settings to ensure they align with your requirements. We can customize the policy further if needed.
After configuring the policy settings, click on the “Save policy” button to save your changes.
— Update record policy
Now, let’s outline the steps for implementing an update record policy for the “users” table, taking into account different scenarios:
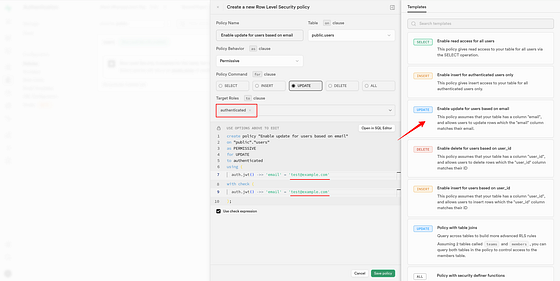
— — — — — — — Granting access to all Supabase auth users — — — — —
For all supabase auth users, setting up an update record policy is straightforward.
1. In the “Add new policy” dialogue box, select the template for updating records.
2. In the policy configuration, set the Target Roles to “Authenticated”.

Add update record policy for all Supabase auth users
This allows any authenticated user, regardless of their specific role, to update the user record in the “users” table.
3. Save the policy to apply the update record restrictions for the “users” table.
— — — — — Granting access to the specific Supabase auth user — — — —
For the specific Supabase auth user, the process is slightly different.
The first and second points are the same as above described for all Supabase auth users.
Now, you’ll need to identify them based on unique identifiers such as their email address.
3. Set the appropriate conditions in the policy configuration to match the email address of the specific user attempting to update their record.
Add update record policy for specific auth user
This allows only specified authenticated users, regardless of their specific role, to update the user record in the “users” table.
4. Save the policy to apply the update record restrictions for the “users” table.
Delete record policy
Now, let’s detail the steps for implementing a delete record policy for the “users” table, using the user’s ID:
— — — — — — — Granting access to all Supabase auth users — — — — —
For all supabase auth users, configuring a delete record policy follows a similar process as before.
1. In the “Add new policy” dialogue box, select the template for deleting records.
2. In the policy configuration, set the Target Roles to “Authenticated”.
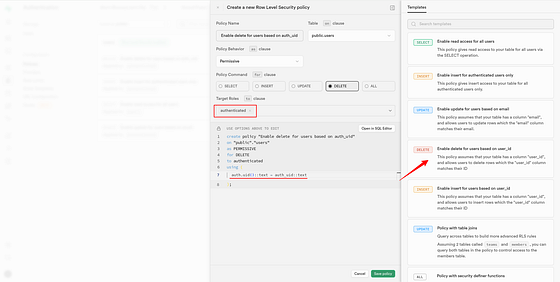
Add delete record policy for all supabase auth users
This allows any authenticated user, regardless of their specific role, to delete a user record in the “users” table.
3. Save the policy to apply the delete record restrictions for the “users” table.
— — — — — Granting access to the specific Supabase auth user — — —
For the specific Supabase auth user, adjust the policy to use the user’s ID:
The first and second points are the same as above described for all Supabase auth users.
Now, for the specific user, you’ll need to identify them based on their user ID.
3. Set the appropriate conditions in the policy configuration to match the user ID of the user attempting to delete their record.
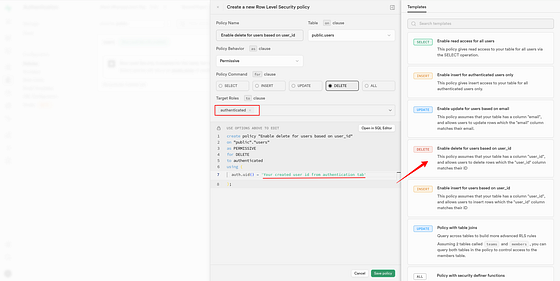
Add delete record policy for specific auth user
This allows only specified authenticated users, regardless of their specific role, to delete the user record in the “users” table.
4. Save the policy to apply the delete record restrictions for the “users” table.
Now, we can see we have Select, Insert, Update, and Delete policies for the “users” table. We can edit or delete it if we find any issues with it.
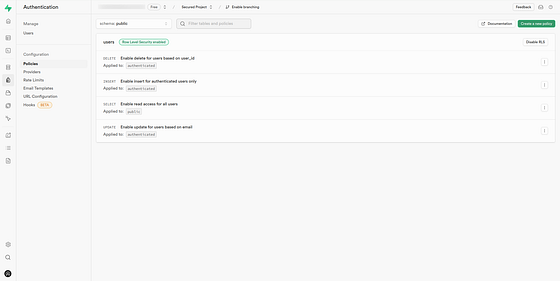
All the policies to access the records of the “users” table
Awesome!!👌Now, our database is secured.
Customize the policy settings as needed, specifying which roles or users have permission to perform the operations on the “users” table.
In addition to database security, securing data stored in cloud storage is equally important.
This post only has implementation of Supabase Database to read the complete guide including securing data storage , please visit our full blog at Canopas.
I encourage you to share your thoughts in the comments section below.
Your input not only enriches our content but also fuels our motivation to create more valuable and informative articles for you.
Follow Canopas to get updates on interesting articles!


